6日目 MOBの追加
今回はMOBを追加していきたいと思います。
MOBの登録は主に3つのクラスで行います。
Entity~~、Model~~、Render~~、の3つです。
これらをこんな感じでメインのクラスに書いておきます。
testmod.java
package testmod;

import net.minecraft.client.renderer.entity.Render;
import net.minecraft.client.renderer.entity.RenderManager;
import net.minecraft.util.ResourceLocation;
import net.minecraftforge.fml.client.registry.IRenderFactory;
import net.minecraftforge.fml.client.registry.RenderingRegistry;
import net.minecraftforge.fml.common.Mod;
import net.minecraftforge.fml.common.event.FMLInitializationEvent;
import net.minecraftforge.fml.common.event.FMLPreInitializationEvent;
import net.minecraftforge.fml.common.registry.EntityRegistry;

@Mod(modid = testmod.MOD_ID, name = testmod.MOD_NAME, version = testmod.MOD_VERSION)
public class testmod {
    public static final String MOD_ID = "testmod";
    public static final String MOD_NAME = "testmod";
    public static final String MOD_VERSION = "1.0.0";

    @Mod.EventHandler
	public void preInit(FMLPreInitializationEvent event) {

    	if(event.getSide().isClient()) {
    		RenderingRegistry.registerEntityRenderingHandler(EntitySample.class, new IRenderFactory<EntitySample> (){
				@Override
				public Render<? super EntitySample> createRenderFor(RenderManager manager){
					return new RenderSample(manager, new ModelSample(), 0.3f);
				}
			});
    	}
    }

    @Mod.EventHandler
	public void Init(FMLInitializationEvent event) {
    	EntityRegistry.registerModEntity(new ResourceLocation("sample"), EntitySample.class, "Sample", 0, this, 50, 1, true, 1000, 22);
    }

}
Entity~~は主にそのMOBの動き方を決めるためのクラスです。
たとえば牛なら小麦によってくるとかうろうろするとか、ゾンビならプレイヤーを追いかけてくるとかそういった動き方を決定します。
Model~~はそのMOBの形を決めます。マイクラのキャラは基本的にすべて直方体の集まりでできています。
たとえばクリーパーは立方体の頭に、平たい直方体の体と、小さくて長い直方体の足4本が組み合わされています。

Render~~は、Modelで作成した直方体に張っていくテクスチャの設定を行っています。
今回は、ツチノコみたいな形のなにかを作っていきます。

まず、EntitySmapleをつくります。
EntitySample.java
package testmod;

import net.minecraft.entity.EntityLiving;
import net.minecraft.world.World;

public class EntitySample extends EntityLiving
{
    public EntitySample(World worldIn)
    {
        super(worldIn);
    }

}
これでなにもしない生き物が生成されます。
つぎにRenderSampleを作成します。
RenderSample.java
package testmod;

import net.minecraft.client.model.ModelBase;
import net.minecraft.client.renderer.entity.RenderLiving;
import net.minecraft.client.renderer.entity.RenderManager;
import net.minecraft.entity.EntityLiving;
import net.minecraft.util.ResourceLocation;
import net.minecraftforge.fml.relauncher.Side;
import net.minecraftforge.fml.relauncher.SideOnly;

@SideOnly(Side.CLIENT)
public class RenderSample extends RenderLiving<EntityLiving>{

	public static final ResourceLocation texture = new ResourceLocation("testmod:textures/entity/sample.png");

	public RenderSample(RenderManager rendermanagerIn, ModelBase modelbaseIn, float shadowsizeIn) {
		super(rendermanagerIn, modelbaseIn, shadowsizeIn);
	}

	@Override
	protected ResourceLocation getEntityTexture(EntityLiving entity) {
		return texture;
	}
}
14行目のResourceLocationで中身にテクスチャの画像を指定します。
最後にModelSampleでモデルを作成します。
バニラのモデルを参考にするとModelクラスの構成は大体こんな感じになっているようです。
public class ModelSample extends ModelBase {

    public ModelSample() { }
    public void render(Entity entity, float f, float f1, float f2, float f3, float f4, float f5) { }
    public void setRotationAngles(float limbSwing, float limbSwingAmount, float ageInTicks, float netHeadYaw, float headPitch, float scaleFactor, Entity entityIn)  {}

}
コンストラクタの中で直方体を追加して配置する位置など決め、rendrで壁画、setRotationAngleで角度や動きを設定しているのだと思います。
まじめにコードを書いてもいいのですが、非常に大変なのでモデルを作るツールを使います。
マイクラのmodのTabulaというmodを使用します。
Files - Tabula – Minecraft Modeler - Mods - Projects - Minecraft CurseForge
Tabulaを使用するためには前提modとしてichunutilが必要なので、それぞれバージョンに合わせてダウンロードします。
Files - iChunUtil - Mods - Projects - Minecraft CurseForge
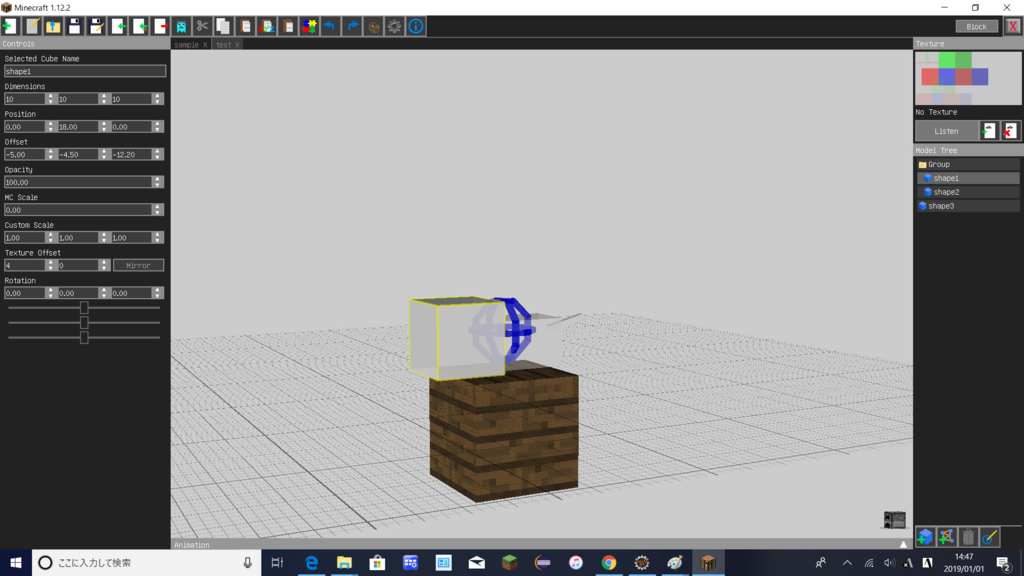
modを導入して、forgeを起動するとタイトル画面に「T」というボタンが追加されているので、これをクリックします。

tabulaが起動するので、0からModelを作る場合は上のタブの緑のプラスマークのアイコンをクリックし、マイクラのモデルをもとに編集する場合は緑の矢印のImpoet From Minecraftをクリックします。
右下のプラスマークがついたブロックをおすとキューブが作成でき、Modelツリーからキューブを選択できます。選択した状態で「delete」キーを押すことで削除もできます。
キューブを選択して、中央のグラフィックや左のパラメーターをいじってブロックの位置や角度を設定します。
設定し終えたら、上の四色のジグソーパズルみたいなアイコンをクリックします。それぞれの直方体のテクスチャをかぶりがないように一枚のpngにまとめてくれます。どうしても被らないように配置できない場合はfailedとでるので、その場合はテクスチャの画像サイズを変更した新しいプロジェクトを作成し、そこに座標込みでコピペします。
テクスチャがうまく配置できたら、赤色の矢印のアイコンを押して、エクスポートします。Java ClassとTexture Mapとそれぞれエクスポートします。
パッケージ名をtestmod、クラス名をModelクラスにして出力しました。
ModelSample.java
package testmod;

import net.minecraft.client.model.ModelBase;
import net.minecraft.client.model.ModelRenderer;
import net.minecraft.entity.Entity;

/**
 * NewProject - sample2
 * Created using Tabula 7.0.0
 */
public class ModelSample extends ModelBase {
    public ModelRenderer shape1;
    public ModelRenderer shape2;
    public ModelRenderer shape3;

    public NewProject() {
        this.textureWidth = 128;
        this.textureHeight = 64;
        this.shape3 = new ModelRenderer(this, 0, 0);
        this.shape3.setRotationPoint(0.0F, 18.3F, 7.6F);
        this.shape3.addBox(-0.5F, -0.5F, 0.0F, 1, 1, 6, 0.0F);
        this.setRotateAngle(shape3, 0.2617993877991494F, 0.0F, 0.0F);
        this.shape2 = new ModelRenderer(this, 0, 15);
        this.shape2.setRotationPoint(0.0F, 18.0F, 0.0F);
        this.shape2.addBox(-3.5F, -1.7F, -2.2000000000000006F, 7, 7, 10, 0.0F);
        this.shape1 = new ModelRenderer(this, 4, 0);
        this.shape1.setRotationPoint(0.0F, 18.0F, 0.0F);
        this.shape1.addBox(-5.0F, -4.5F, -12.199999999999992F, 10, 10, 10, 0.0F);
    }

    @Override
    public void render(Entity entity, float f, float f1, float f2, float f3, float f4, float f5) {
        this.shape3.render(f5);
        this.shape2.render(f5);
        this.shape1.render(f5);
    }

    /**
     * This is a helper function from Tabula to set the rotation of model parts
     */
    public void setRotateAngle(ModelRenderer modelRenderer, float x, float y, float z) {
        modelRenderer.rotateAngleX = x;
        modelRenderer.rotateAngleY = y;
        modelRenderer.rotateAngleZ = z;
    }
}
テクスチャはこんな感じです。

ちなみにマイクラで直方体1つを表すテクスチャはこんな感じです。

長方形に6枚のパネルが並んだ形です。この長方形を互いにぶつかり合わないように、1枚のpng上に必要な数だけ並べたものがEntityのテクスチャとなっています。
(正確には白い部分は読み込まれないので、色のついた部分が重ならなければOKです。)
そして、目的の直方体のテクスチャのサイズ(x,y,z)と、それがpng上のどこにあるのかを与えてやればうまく読み込まれるはずです。
this.shape = new ModelRenderer(this, X, Y);
this.shape2.addBox(float offx, float offy, float offz, x, y, z, scale);
これらのメソッドがその役割なのですが、たくさんxとかyがあってややこしいですね。
ModelRendererの赤い大文字のX,Yはpng上の長方形の始まり(左上)の座標を表しています。
addBoxの第4~6引数の青文字のx,y,zが直方体のx,y,zのサイズになっています。
ちなみに第1~3引数はオフセットで、読み込んだ直方体を表示する場所を設定します。
Tabulaが作ってくれたModelSampleクラスを他のモデルクラスと同じような形にするために、少し変更しました。
ModelSample.java
package testmod;

import net.minecraft.client.model.ModelBase;
import net.minecraft.client.model.ModelRenderer;
import net.minecraft.entity.Entity;
import net.minecraft.util.math.MathHelper;

/**
 * test2 - Undefined
 * Created using Tabula 6.0.0
 */
public class ModelSample extends ModelBase {
    public ModelRenderer shape1;
    public ModelRenderer shape2;
    public ModelRenderer shape3;

    public ModelSample() {
    	 this.textureWidth = 128;
         this.textureHeight = 64;
         this.shape2 = new ModelRenderer(this, 0, 0);
         this.shape2.setRotationPoint(0.0F, 18.0F, 0.0F);
         this.shape2.addBox(-3.5F, -1.7F, -2.2000000000000006F, 7, 7, 10, 0.0F);

         this.shape3 = new ModelRenderer(this, 0, 18);
         this.shape3.setRotationPoint(0.0F, 18.3F, 7.6F);
         this.shape3.addBox(-0.5F, -0.5F, 0.0F, 1, 1, 6, 0.0F);

         this.shape1 = new ModelRenderer(this, 0, 30);
         this.shape1.setRotationPoint(0.0F, 18.0F, 0.0F);
         this.shape1.addBox(-5.0F, -4.5F, -12.199999999999992F, 10, 10, 10, 0.0F);
    }

    @Override
    public void render(Entity entity, float f, float f1, float f2, float f3, float f4, float f5) {
        this.shape1.render(f5);
        this.shape2.render(f5);
        this.shape3.render(f5);
    }

	@Override
	public void setRotationAngles(float limbSwing, float limbSwingAmount, float ageInTicks, float netHeadYaw,
			float headPitch, float scaleFactor, Entity entityIn)
	{
		this.shape3.rotateAngleX = 0.26F;
	    this.shape3.rotateAngleY = MathHelper.cos(limbSwing * 0.6662F) * 1.4F * limbSwingAmount;

		System.out.println("value1 "+limbSwing+", value2 "+limbSwingAmount);
	}
}
ついでに尻尾がうごくように少し編集しました。setRotationAnglesの中のrotationAngleYにクリーパーの足の動きをコピペしました。なのでMOBが移動したときにしか尻尾が動きませんが。
limbSwingとlimbSwingAmountがいまいちわからなかったので、コンソール中に表示するようにしました。

setRotationAnglesはMOBが画面上に移っていると毎tick呼ばれているみたいです。
limbSwingはおそらく、MOBの移動距離に応じて変化していて1:1かどうかはわかりませんが、比例しているように思えます。
limbSwingAmountは0~1の値をとっており、剣で殴ったりしてMOBが大きく動いた時は1を静止しているときはほぼ0の値をとっていました。
これらの値をうまくつかうことで、細かい動きなどを表現できそうです。
最後に動作確認ですこしMOBを動かしてみました。
Entityクラスで継承しているEntityLivingをEntityCowに書き換えて形はこのままで、機能を牛にしました。

牛なので小麦についてきます。ちゃんと尻尾が振れていますね!
ただ牛なのでドロップアイテムは牛肉ですね笑
こいつが牛肉を落とすのは変なので、次回はEntityクラスを編集して機能を変えようと思います。